-->

Theme Layout

Boxed or Wide or Framed

Theme Translation

Display Featured Slider

Featured Slider Styles

Display Grid Slider

Grid Slider Styles

Display Trending Posts

No

Display Author Bio

Display Instagram Footer

Copyright © 2014 Learning and Exploring Through Play - All Rights Reserved. Powered by Blogger.

Daffodil Handprint Art


Spring will soon be here. The daffodils, snowdrops and crocuses are starting to bloom providing us with some beautiful, well missed colour.

As soon as the daffodils start being sold in the shops, I have them around my home in vases. Daffodils are a sign  that Nature is beginning to start waking after the bitter cold winter and frosts.

QuickEdit
Learning Through Play
0 Comments
Share :

Funny Cat in Snow


This adorable kitty is stuck out in the snow.

Winter this year has brought some very heavy snowfall and this scene has been a common sight for lots of families across the world.

When this cat is out in the snow and wants to go back home there is only one way to do it -


QuickEdit
Learning Through Play
0 Comments
Share :

Pom Pom Drop


Today I am going to share with you a game perfect for Toddlers that we have enjoyed putting together, using some simple items that you may have already lying around your home.

I am always amazed at how the simplest of activities and play set ups entertain young children for the longest time.

QuickEdit
Learning Through Play
6 Comments
Share :

Ladybird Minibeast Foot Print Art


We have been taking a look at some minibeasts that we will be seeing a lot more of over the coming months as the weather gets a little warmer.

Today we have made some fun ladybird prints using our feet, linking in perfectly to the Minibeast Topic.

You will need:
Paper
Black and Red Paint
PVA Glue
Googly Eyes
Paintbrushes
Q-Tips

1. Using a paintbrush I painted Little N's foot Red and her heel black. She loved having her feet painted and giggled to herself as the strokes of the brush tickled her.

3. Press down your foot print onto the paper and leave it to dry.

4. Using PVA glue add some googly eyes.

5. Using a paintbrush, paint a line straight down the centre of the ladybird.


6. Add spots using a Q-tip.

..... and there we have it, your very own lovely ladybird.


You may also like:

QuickEdit
Learning Through Play
0 Comments
Share :

Bumble Bee Minibeast Handprints


We have been taking a look at some minibeasts that we will be seeing a lot more of over the coming months as the weather gets a little warmer.

Today we have made some fun bumble bee prints using our hands. Little N loves getting paint on her hands and found the tickling of the brush on her palms really amusing!

You will need:

Paper
Black and Yellow Paint
PVA Glue
Googly Eyes
Paintbrushes

1. Using a paintbrush I painted yellow and black stripes on Little N's hand. She giggled to herself as the strokes of the brush tickled her palm. For the bumble bee you wont need to paint the thumb.

3. Press down your stripy hand print onto the paper and leave it to dry.

4. Using PVA glue add some googly eyes.

5. For the bumble bee's mouth, I cut down a 'heart' sticky backed foam shape.


..... and there we have it, our very own Buzzing Bumble Bees.


You may also like:


QuickEdit
Learning Through Play
0 Comments
Share :

Spider Handprints


We have been taking a look at some minibeasts that we will be seeing a lot more of over the coming months as the weather gets a little warmer.

Today we have made some fun spider prints using our hands. Not only linking to the minibeast theme but also an adorable Incy Wincy Spider craft for the well loved Nursery Rhyme.

You will need:
Paper
Black Paint
Baby wipes
PVA Glue
Googly Eyes


1. I squirted a small amount of black paint onto Little N's hands. She enjoyed rubbing her hands together - covering her hands in cold, oozy, black paint.

2. Using a baby wipe I wiped the paint off her thumbs. We could have just painted her fingers and missed out her thumbs however Little N enjoys the sensory sensation of exploring and feeling the paint in her hands on her own.

3. Overlapping her palms, together we created a spider. Her fingers created 8 spiders legs.

4. Using PVA glue Little N added some googly eyes.

5. For the spiders mouth, I cut down a 'heart' sticky backed foam shape.

..... and there we have it, our very own 'Incy Wincy Spider'.


You may also like:


QuickEdit
Learning Through Play
0 Comments
Share :

Shamrock Printing for Toddlers


Here is a fun upcycled toilet roll Lucky Clover stamper, great fun for quick, easy and effective art that is perfect for young children!

We had been experimenting with different painting techniques over the last week using:
- hands
- stampers
- paintbrushes
- sponges


Little N had wanted to paint with the colour green so once these paintings were dry I kept them to one side ready to use in this lucky clover printing.

So not only were we recycling the toilet rolls but we were also reusing her previous paintings she had done.


You can use 3 toilet rolls to create a Shamrock or use 4 to create a lucky clover. Little N wanted to use to use 4.


1. Apply pressure to the rolls to create a heart shaped tube, like above.

2. As Little N is only 2 years old I attached the 4 toilet rolls together using tape. I would advise using tape over ribbon or string as tape will hold the rolls in place and make a more effective stamper. If you are doing this with older children you can use just the 1 stamper and get them to match up the heart stamps to create their own shamrocks.


3. As the background was painted green I decided to create a 'rainbow' paint palette. I squirted a variety of colours onto a tray, when the stampers were dipped into the paint they had rainbow outline!


4. It was then time for the fun part. Dipping the toilet roll shamrock stamper into the rainbow paint.


5. Once the stamper is covered in paint, start printing on paper. Some of the shamrocks that were spaced out enough I cut out and created a Shamrock garland, which made a lovely decoration.


You may also like:


QuickEdit
Learning Through Play
0 Comments
Share :

Learning Through Music


Today we have Nancy joining us, she helps children to remember different concepts through fun, upbeat, catchy music and rhymes.

Hello, I am Nancy an Early Childhood Educator (B.A., E.C.E.), and studied music with the Royal Conservatory of Canada.  
After teaching Preschool and Kindergarten for almost 10 years, I found that music was one of the most effective memory tools when teaching young children anything.
Whether it was tidying up or learning the letters of the Alphabet (who doesn't sing the alphabet when alphabetizing?) so I started writing my own songs.

One of the first songs I wrote was called "Planets, Planets", to help children remember the names and order of the planets from the sun outwards.  It stuck immediately, and I was inspired to continue writing music that serves as a memory device. 

I also branched out and wrote songs to support self-esteem which can be found on 'I Know I'll Grow' and 'Wonderful You.
I have 3 albums on iTunes of original, educational music:
Today I would like to share with you three of my songs that share an Earth/ Geography" theme.

Planets, Planets - Album: I Know I Will Grow:


The 7 Continents and 5 Oceans - Album: The Seasons:


The Canada Song - Album: Wonderful You


I have more in the works for this year.  I travel all over Toronto, Ontario, doing concerts, music classes and events. Its also great to see people enjoying my songs through my YouTube channel.

You can also find Nancy on Facebook, Pinterest, Instagram, Twitter, and of course iTunes.


You may also like:


QuickEdit
Learning Through Play
1 Comments
Share :

Chinese Lanterns


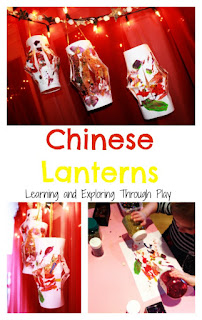
We have created some beautiful Chinese Lanterns using my 2 years olds art work.
Little N is always doing something messy and creative. She loves painting, sticking and drawing. I love seeing her getting completely absorbed in her messy play!

With Chinese New Year upon us and my daughters art work piling up high I decided to combine the two and create some colourful decorations.

Note: Post contains Amazon Affiliate Links.

You will need:
- Dried paintings
- Sequins (UK/US)
- Glitter (UK/US)
- Scissors (UK/US)
- Glue spreaders (UK/US)
- PVA Glue (UK/US)
- Glue Stick (UK/US)
- Ribbon (UK/US)


Step 1
Begin by decorating the dried paintings using glue, sequins and glitter.
You can use either PVA glue or prit stick.


Little N did this for around 40 minutes. She loved squeezing the PVA glue onto her paper and pushing sequins down into the oozy, white glue. PVA is great for younger children as they can see the glue, so know where to stick. Little N gets puzzled when using the glue sticks and quickly looses interest.

Step 2
Once the paintings are decorated and you have allowed enough time for the glue to completely dry, fold the paper in half (landscape).

Step 3
Take your scissors and cut slits into the paper, taking care not to cut down to the edges. Cut the slits around 1cm apart.
Tip: If you have any accidents and your slits are made too far, use sellotape to stick it back together.

Step 4
Open out your paper now and holding your lantern landscape glue the ends together.

Step 5
Attach a handle to the top of your lantern. We used gold ribbon.


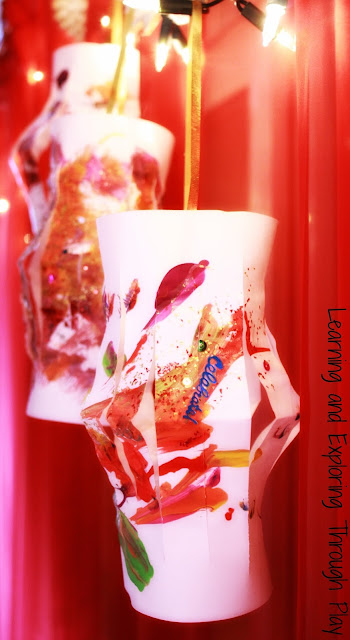
......and there we have it. In 5 simple steps you can create some beautiful lanterns, perfect decorations for the Chinese New Year, using your little ones art work.

These lanterns also make great decorations for parties and out in the garden during the Summer months.


You may also like:

QuickEdit
Learning Through Play
0 Comments
Share :

Wool Easter Egg Treats


Wool Easter Egg Treats - Easter Crafts


Easter is fast approaching and today I am sharing with you a fabulously fun treat that you can make for the children, or even better - with them. Great to give as treats, use on egg hunts or hang up on your Easter Trees. Simple to create. They look fab and you can customise them according to your children's needs and preferences. 

Use chocolate covered eggs - widely available this time of year, wrapped sweets, stationary or mini figures. The possibilities are endless here. Why not visit the party favours isle to see if there is anything that your children would like from there too?
QuickEdit
Learning Through Play
0 Comments
Share :

Custard Sensory Box


Sensory Play is so valuable for young children and we try to do as much of it as we can, this week we explored a custard filled sensory bin that was great for stimulating all 5 senses:

Sight - The was the custard looked. They way it fell off the utensils. How it changed the look of the containers.
Smell - The scent of custard was sweet and inviting.
Taste - The taste was delicious.
Hearing - The sounds that came from the thick oozy custard as it was being stirred and poured.
Touch -  The way it felt between our fingers.

You will need:
Several packets/tins of custard
A container
A variety of Utensils
Bowls
Jugs


Begin by preparing the custard. If like us you choose the powdered custard that needs to be made with HOT water you will need to wait until the temperature is suitable for your little one, before making it available to play.


Consider the invitation for play and make it appealing, add a variety of different bowls, jugs and utensils that will allow hands on exploring.


Once the custard has cooled it is now time for hands on exploring.

Always consider allergies before allowing sensory play with food items.

Little N particularly enjoyed filling and emptying during this sensory play. She used her hands, spoons, bowls and jugs to fill containers before emptying them again.


She enjoyed putting her hands into the custard and swishing them around. She would then examine her hands.

Take into consideration:

-I would highly recommend that you cover your flooring as this activity can get rather messy.
-Wear aprons if you prefer however old clothes are great too and give children more freedom and flexibility during the activity.
-I found the custard stained the clothing after they had been washed so keep this in mind.

We had great fun and look forward to doing custard play again very soon!


You may also like:


QuickEdit
Learning Through Play
0 Comments
Share :
[name=Amy] [img=https://blogger.googleusercontent.com/img/b/R29vZ2xl/AVvXsEhGsC8Yis3OKG4o07gvyn9RiKcLAnuVXWJP-1QE5smwvxCVVihWrizE5MfUZqZQhTDN4mRvsqa0G88bcvJwq1XfUUkuUHksBOMJJrRSYO-P_zC2cO7AYyAEdu89fqea9kMcStN0IpWf984/s1600/learning+and+exploring+pic.png] [description=Hello!!] (facebook=https://www.facebook.com/learningandexploringthroughplay) (twitter=https://twitter.com/amylouise867) (instagram=https://instagram.com/learningthroughplay8/) (pinterest=https://www.pinterest.com/learningviaplay/)

Follow @learningthroughplay8